オタク日記
(Mac と Linux, 2018Q4)
目次
2018-12-19 (Wed): PyVenv (その 2)2018-12-12 (Wed): PyVenv (その 1)
2018-12-05 (Wed): Matplotlib-3.0 (その 2)
2018-11-28 (Wed): Matplotlib-3.0
2018-11-14 (Wed): 宅外サーバ (その 3)—Apache+SSL/TLS
2018-11-07 (Wed): 宅外サーバ (その 2)—Apache+mod_wsgi
2018-10-31 (Wed): 宅外サーバ (その 1)—Ubuntu-18.04
古い日記:
2018Q3
2018Q2
2018Q1
2017Q4
2017Q3
2017Q2
2017Q1
2016Q4
2016Q3
2016Q2
2016Q1
2015Q4
2015Q3
2015Q2
2015Q1
2014Q4
2014Q3
2014Q2
2014Q1
2013Q4
2013Q3
2013Q2
2013Q1
2012 年
2011 年
2010 年
2009 年
2008 年
2007 年
2006 年
2005 年
2004 年
2003 年
2002 年
2001 年
2018-12-19 (Wed): PyVenv (その 2)
OS/Base Python への依存性
これまで述べて来たように、PyVenv は単純かつ強力なので、platform への依存性は少ないし、メンテナンスも容易になっている。 とは、言え若干の非互換性の問題は残っている。macOS
High Sierra (現在 10.13.6) の上の MacPorts の Python-3.6 (現在 3.6.7)
で構築・運用しているが、自分が常用している事もあり、最もよくテストされていて、
かつ、一番問題の少ない環境となっている。実際、以下のような、
requirements.in で、
# requirements.in
django
mod-wsgi
ipython
jupyter
numpy
scipy
matplotlib
simplejson
certifi
# miniupnpc
requests
drawnow
pyftpdlib
Pillow
pandoc
pip-compile/pip-sync
で、計 68 個のモジュールがインストールされ、
メンテナンスされているが、ここ何ヶ月か問題は出ていない。
但し、ここでコメントアウトされている miniupnpc だけは問題児で、 今回、確認のために uninstall/install してみたら、install できなかった。 (以前からこの問題は有ったが、ここ半年程は問題無く使えていた。)
Ubuntu-16.04
宅外サーバでは、ずっと 16.04 を使っていて、18.04 で新しいホストを立てたのは、ここ一月程の事である。
16.04 の apt で install される Python3 は 3.5.2 であるが、
それをベースに、PyVenv を構築しても問題無い——常用しているのは、
mod-wsgi, numpy, scipy, jupyter, ipython, matplotlib-1.5.3 等。
(最近まで誤解していたのだが、% python3 -m venv
が推賞されるのは、3.5 からなので、これは尤もな結果。)
その誤解と、CGI に 3.6 が必要な snipet を入れてしまうというチョンボのせいで、Python-3.6 に移行したくなり、 apt repository を
fukuda@digoc02:~% sudo add-apt-repository ppa:deadsnakes/ppa
等として apt repository を加えて、3.6 を apt install してみたが、install はできたものの、Tk-inter module がらみのエラーで、 module をインストール (pip-compile) できないものが出てきた。 Repository を変更して
fukuda@digoc02:~% sudo add-apt-repository ppa:jonathonf/python-3.6
にすれば、問題なくインストールできるようになったが、 deadsnakes での四苦八苦に凝りて、-3.5.2 の venv に戻った。 (PyVenv の素晴しいところは、(完全に分離された) venv をいくらでも並行して持てる事。)
Ubuntu-18.04
Ubutu-18.04 になると、apt でインストールされる Python3 が、3.6.x となったので、以上のような右往左往は不要。(但し、python3.6-dev, python3.6-venv のインストールが (追加的に) 必要なのは変わらない。)
$$$
fukuda@digoc03:~% sudo apt install python3.6 python3.6-venv python3.6-dev
fukuda@digoc03:~% python3.6 -m venv pve36
fukuda@digoc03:~% cd pve36
fukuda@digoc03:~/pve36% . bin/activate
(pve36) fukuda@digoc03:~/pve36% cat requirements.in
django
mod-wsgi
ipython
jupyter
numpy
matplotlib
simplejson
certifi
requests
drawnow
miniupnpc
pyftpdlib
Pillow
で、全部のモジュールが問題なくインストールできた。(実は、 miniupnpc は以前はインストールできず、問題児だった。)
あれやこれや
pip/pip-tools
pip は、元々は、通常の環境下で PyPI から module をダウンロード・インストールするためのツールであるが、 しかし、venv の中で、pip-tools (pip-compile/pip-sync) と一緒に使われる時に最も力を発揮すると思われる。
しかし、python3 -m venv で PyVenv 環境を作る時にインストールされる pip は最新版ではないし、 pip-tools に至っては、インストールさえされていない。 要は、私の推す「pip-compile/pip-sync でメンテナンス」は、 Python 界隈ではまだ然程認知されていない (信用されていない)、 という事かも知れない。
実際、最近まで「pip のバージョン」は PyVenv にとってかなりクリティカルだった。つまり、うっかりこれをバージョンアップすると、 モジュール間の依存関係の解決に失敗して、インストールできない事もよく有ったという事。 多分その所為で、最初にインストールされる pip のバージョンが古いままになっているのだろう。
そのくせ、そのままのバージョンで使おうとすると、「古いよ」とのワーニングが出る。
fukuda@falcon:~% python3.6 -m venv pve36
fukuda@falcon:~% cd pve36
fukuda@falcon:~/pve36% . bin/activate
(pve36) fukuda@falcon:~/pve36new2% pip install pip-tools
.....
Successfully installed click-7.0 pip-tools-3.2.0 six-1.12.0
You are using pip version 10.0.1, however version 18.1 is available.
You should consider upgrading via the 'pip install --upgrade pip' command.
ちょっと悩ましいところだが、「今のところ 10.0.1 より新しければ (つまりそれをアップグレードしてもしなくても) 問題は出ない」が、最近の経験からの結論。(私は、ワーニングが嫌なので、 アップグレードする事にしている。)
mod-wsgi/django
Python モジュールは、Python や iPython から import
して使う事が殆んどで、そのような場合はあまり PATH
について思い悩む必要はない。どこから python (ipython) とやっても、
${PYVENVHOME}/bin/python3.6が立ち上がり、
その python3.6 は、
${PYVENVHOME}/lib/python3.6/site-packages/
以下のモジュールを import しようとするから。
しかし、Django/mod-wsgi については、少々面倒になる。 全体像は、2018-11-07 の日記にあるので、 ここでは、apache2 の設定に関した事項だけ再掲する
まず、(pip install した) mod_wsgi に付いて来る mod_wsgi-express コマンドを使って、
(pve36) fukuda@digoc03:~/pve36% mod_wsgi-express module-config
LoadModule wsgi_module \
    "/home/fukuda/pve36/lib/python3.6/site-packages/mod_wsgi/server/mod_wsgi-py36.cpython-36m-x86_64-linux-gnu.so"
WSGIPythonHome "/home/fukuda/pve36"
この結果を用いて、mod_wsgi.load を変更し、また
wrm_dms2.conf を作製する。
(pve36) fukuda@digoc03:/etc/apache2% cat mods-available/wsgi.load
#LoadModule wsgi_module /usr/lib/apache2/modules/mod_wsgi.so
LoadModule wsgi_module /home/fukuda/pve36/lib/python3.6/site-packages/mod_wsgi/server/mod_wsgi-py36.cpython-36m-x86_64-linux-gnu.so
(pve36) fukuda@digoc03:/etc/apache2% cat sites-available/wrm_dms2.conf
<VirtualHost *:80>
  ServerName dms.waremo.com
  ServerAlias dms.waremo.mine.nu
  WSGIScriptAlias / /home/fukuda/wrm_dms2/mysite/wsgi.py
#  WSGIApplicationGroup %{GLOBAL}
  WSGIDaemonProcess dms.waremo.com\
     python-path=/home/fukuda/wrm_dms2:/home/fukuda/pve36/lib/python3.6/site-packages
  WSGIProcessGroup dms.waremo.com
.....
2018-12-12 (Wed): PyVenv (その 1)
Python のモジュールは沢山あり (PyPI には Python3 対応のモジュールが 10,000 以上あるんだとか)、 そのうちの幾つか (iPython, Jupyter, Django, scipy, mod-wsgi, etc.) はとても大掛かりで、 多数の他のモジュールに依存するので、インストールにてこずる事があったし、 そのメンテナンスをする (最新の版に揃えて、かつ確実に動かす) となるともっと大変だった (今も)。 だが、PyVenv (Python Virtual Environment) によれば、その「大変さ」をかなり軽減できる。 (他のやり方をよく知らないので、「最良」とは断言できないが、 手で、インストール・メンテナンスを行なう場合と比較すれば、 圧倒的に便利だと言えそう。)
殊にここに来て (主なプラットフォームの上では) かつてあった種々の「問題」を殆んど克服できているように見える。 ここでは、過去の経緯には深く入らず、最新の状況 (つまり、Python-3.6 以降) での環境の構築法および維持の方法を提案する。
基本環境
PyVenv の基になるアイディアはとてもシンプルで、従って「構築」の手順も簡単:
fukuda@falcon:~% python3.6 -m venv pve36  #1)
fukuda@falcon:~% cd pve36
fukuda@falcon:~/pve36% . bin/activate     #2)
(pve36) fukuda@falcon:~/pve36% pip --version
pip 10.0.1 from /Users/fukuda/pve36/lib/python3.6/site-packages/pip (python 3.6)
(pve36) fukuda@falcon:~/pve36% pip install pip --upgrade  #3)
.....
Successfully installed pip-18.1
(pve36) fukuda@falcon:~/pve36% pip install pip-tools  #4)
ここに:
- #1) このコマンド一発で、例えば
pve36というディレクトリの下に、Python 他のコマンド (の link) を集める。
fukuda@falcon:~% tree -L 3 pve36
pve36
├── bin
│   ├── activate
│   ├── activate.csh
│   ├── activate.fish
│   ├── easy_install
│   ├── easy_install-3.6
│   ├── pip
│   ├── pip3
│   ├── pip3.6
│   ├── python -> python3.6
│   ├── python3 -> python3.6
│   └── python3.6 -> /opt/local/bin/python3.6
├── include
├── lib
│   └── python3.6
│       └── site-packages
└── pyvenv.cfg
- #2) 上記、bin/activate は shell script で、要するに
- shell の PATH の先頭に、
'/Users/fukuda/pve36/bin'を付加し - shell の prompt (PS1) の先頭に
'(pve36)'を付加する
% pythonとやれば、/opt/local/bin/python3.6が立ち上がり、sys.pathには/Users/fukuda/pve36/lib/site-packageが付加される (最後尾に)。 - shell の PATH の先頭に、
- #3) 上記の #1) で既に pip はインストールされているが、必ずしも最新版ではないので、 自分自身をアップデートしておく。
- #4) 後で、pip-compile/pip-sync を使うために、それらを含む pip-tools をインストールしておく。
モジュールのインストール
上記までで、pip を使っての Python モジュールのインストールやメンテナンスが可能になっているが、ここでは、 pip-compile/pip-sync を使ったやり方を示す。
(pve36) fukuda@falcon:~/pve36% cp ~/pve36bak/requirements.in . #1)
(pve36) fukuda@falcon:~/pve36% cat requirements.in
django
mod-wsgi
ipython
jupyter
numpy
scipy
matplotlib
(pve36) fukuda@falcon:~/pve36% pip-compile                     #2)
#
# This file is autogenerated by pip-compile
# To update, run:
#
#    pip-compile --output-file requirements.txt requirements.in
#
appnope==0.1.0            # via ipython
backcall==0.1.0           # via ipython
bleach==3.0.2             # via nbconvert
cycler==0.10.0            # via matplotlib
decorator==4.3.0          # via ipython, traitlets
defusedxml==0.5.0         # via nbconvert
django==2.1.4
entrypoints==0.2.3        # via nbconvert
.....
(pve36) fukuda@falcon:~/pve36% pip-sync          #3)
Successfully installed appnope-0.1.0 backcall-0.1.0 bleach-3.0.2 cycler-0.10.0
decorator-4.3.0 defusedxml-0.5.0 django-2.1.4 entrypoints-0.2.3
.....
(pve36) fukuda@falcon:~/pve36% python            #4)
Python 3.6.7 (default, Oct 21 2018, 09:26:25)
[GCC 4.2.1 Compatible Apple LLVM 9.1.0 (clang-902.0.39.2)] on darwin
Type "help", "copyright", "credits" or "license" for more information.
>>> import sys
>>> sys.path                                     #5)
['', '/Users/fukuda/script',
  .....
  '/opt/local/Library/Frameworks/Python.framework/Versions/3.6/lib/python3.6/lib-dynload',
  .....
  '/Users/fukuda/pve36/lib/python3.6/site-packages']
>>> import numpy as np
>>> np.__file__                                  #6)
'/Users/fukuda/pve36/lib/python3.6/site-packages/numpy/__init__.py'
>>> import math
>>> math.__file__
'/opt/local/Library/Frameworks/Python.framework/Versions/3.6/lib/python3.6/\
    lib-dynload/math.cpython-36m-darwin.so'
ここに、
- #1) 使いたいモジュールのリスト (
requirements.in) を作製するか既存のものをコピーしてくる。 - #2) pip-compile command は上記
requirements.inでリストアップされた module に必要な (依存している) モジュールを (PyPI から) 捜して、最新版を決定し、 表 (requirements.txt) にする事。 ここに表示されている「出力」がそのまま、requirements.txtになる。 - #3)
requirements.txtに合致するように、 モジュールをダウンロード・コンパイルしてインストールする。 - #4) venv の環境下で python と打てば、python3.6 が立ち上がる。
- #5) この Python では import path として、
~/pve36/lib/...が、付加されている。 - #6) venv に install されている numpy と、builtins の math で、それぞれ、import されているファイルへの PATH が違っている事に注意。
モジュールのメンテナンス
(pve36) fukuda@falcon:~/pve36% emacs -nx requirements.in     #1)
(pve36) fukuda@falcon:~/pve36% pip-compile  --upgrade        #2)
.....
(pve36) fukuda@falcon:~/pve36% pip-sync                      #3)
ここに
- #1) モジュールの追加削除は、専ら
requirements.inでやる。(追加削除が無く、モジュールの更新だけであれば、この行は不要。) - #2)
--upgradeは、requirements.inの変更が無い場合、つまり、モジュールの更新のみの場合に必要。 (いずれにしても付加が問題になる事は無さそうなので、 私はいつもこのオプションを付ける事にしている。) - #3)
requirements.txtに合致するように、 モジュールを追加・アップグレード・削除する。
つまり、% pip-compile --upgrade; pip-sync だけで、macOS の
# port self-update; port upgrade outdeted や
ubuntu の # apt update; apt upgrade
と同じように、command や library を最新に保てる訳だ。
ちなみに、ベースの Python (この場合、python-3.6) が、MacPorts や apt
でアップグレードされても、
% python3.6 -v venv xxxx
で環境を再構築する等という必要は全くない。(少くとも、3.5 → 3.6 → 3.7
では何も問題無かった。)
Notes
重複を厭わず、重要だと思われる点をまとめておく。
- ベースとなる Python (つまり
% python3.6 -m venvとする時のpython3.6) を適切に選ぶ事は非常に重要で、 この選定が不味いと、 アップグレードの際に PyVenv の一貫性が保てない可能性が高まるし、 時には最初から特定のモジュールをインストールできない事もある。 とりあえず、現状望ましいと解っているのは:- macOS: MacPorts の Python-3.6.x (x >= 2, 最新版は x = 7)
- Ubuntu-16.04: apt repository の johathanf からの Python-3.6.x (x >= 6, 最新版は x = 7)
- Ubuntu-18.04: (純正 apt repository の) Python-3.6.x (x >= 5, 最新版は x = 7)
- Raspbian: (純正 apt repository の) Python-3.5.2. (3rd party repository から、Python3.6.x を install する事を検討中。)
python3.6だけではなくて、python3.6-dev, python3.6-venvもインストールしておく事が必要。 - 追加のモジュールは、全て PyVenv でインストールする。つまり MacPorts や apt repository からは一切インストールしない。(これを守らないと、 モジュール間の依存性に問題が出る可能性が高くなる。)
- 上記の PyVenv でのインストールは (個別に pip でインストールせず)
requirements.inを通じて、pip-compile/pip-sync で行なう。(pip 自身と pip-tools は例外。) - メンテナンスも同様に、
requirements.inを通じて行なう。 例えば、モジュールを最新版にしたくない、つまり版を固定したい場合は、..... numpy scipy matplotlib==1.5.3 .....
のようにしておけば、爾後は、matplotlib のみ 1.5.3 版に固定して、 他のモジュールを最新にしようとする。(その時、依存関係もきちんと考慮される。)
2018-12-05 (Wed): Matplotlib-3.0 (その 2)
2018-12-18 (Tue): 肝心のl matplotlibrc/real-classic.mplstyle
を書き忘れていた。混乱を避けるために、スタイル名、ファイル名を
real-classic から true-classic
に変えた上で書き加えておく。
先週までで、true-classic の見栄えを実現するためには、改変した
matplotlibrc を CWD 毎に置くのではなく、
~/.matplotlib/matplotlibrc
に置くのが良いのではないか、という結論になり、
それでしばらくやってきている。
しかし、matplotlib を import
する時にのみそれらの設定を読み込むという戦略では、Python shell, iPython shell
で作業をしている時は然程問題はないが、Jupyter Notebook
で任意の script の cell を選択的に実行できるとなると、
なかなか面倒になる。mpl.rcParams() で個別に設定する場合は、
Python/iPython でも実際にプロットに反映されるかどうか
「やってみないと解らない」状態になっていた。(パラメータによっては、
どうしても反映されないものがある。)
Classic Style
一方で、既定の style を読み込む方法は、このような不安が無い。例えば、classic style でこれをやると、以下のようになる。(Jupyter Notebook 上で実行した。)
import matplotlib.pyplot as plt
import numpy as np
import matplotlib as mpl

x = np.arange(-10.0, 10.0, 0.01)
y = np.cos(x) * np.exp(-x * x / 10.0)
x1 = np.arange(-10.0, 10.0,0.7)
y1 = np.random.normal(np.cos(x1) * np.exp(-x1 * x1 / 10.0), 0.02)
mpl.rcdefaults()
plt.figure(1, figsize=(4, 3))
plt.plot(x, y, x1, y1, 'o')
plt.savefig('default.png')
plt.show()
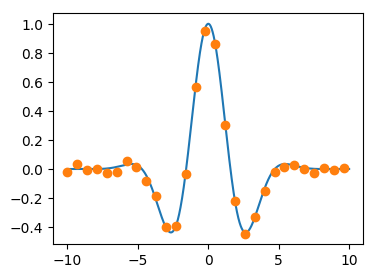
Fig.1, Matplotlib3 "default" style
mpl.rcdefaults()
mpl.style.use('classic')
plt.figure(1, figsize=(4, 3))
plt.plot(x, y, x1, y1, 'o')
plt.savefig('classic.png')
plt.show()

Fig.2, Matplotlib3 "classic" style
後者のプロットは、なかなか良い線を行っていて、
-
mpl.rcdefaultsで parameter を一旦リセットした後も、 Jupyter kernel を restart する事なく、style をきちんと設定できている。 - ('classic' の名に恥じず) フレームの上下、左右の両端に tick が来ている。
- また、ticks の刻みが合理的
ところが、一方で
- サイズが微妙におかしく (小さく) なる。
- Axes (フレーム) の外側が灰色になる。但し、これは Jupyter の上でだけの話。(png ファイルに書き出せば、この灰色の領域は無くなる。)
- Scatter plot (marker) が「中空」でない
などの「問題」が有った。(実はこの 'classic style' も極初期に試したが、これらの「問題」が気に入らず早々に捨てたのだった。
しかし、今回は上記のメリットを生かしたい、という事もあり、 ちょっと真面目に調べてみた。その結果、
- 'cassic style' の実体は、PVEHOME を PyVenv の home,
すなわち例えば
/Users/fukuda/pve36とすると、${PVEHOME}/lib/python3.6/site-packages/matplotlib/mpl-data/stylelib/classic.mplstyleにあり、 - 中身は、matplotlibrc の各パラメータを上書きする形になっている。
- このディレクトリに、xxxxx.mplstyle というファイルを置いておけば、
- mpl.style.use('xxxxx') というメソッドで、'xxxxx style' を読み込み設定する事ができる。
という事らしい。
True-Classic Style
これに沿って、先週作った matplotlibrc
から、
# true-lcassic.mplstyle
axes.autolimit_mode  : round_numbers
axes.xmargin         : 0  # x margin.  See `axes.Axes.margins`
axes.ymargin         : 0  # y margin See `axes.Axes.margins`
xtick.top            : True   # draw ticks on the top side
xtick.direction      : in    # direction: in, out, or inout
ytick.right          : True  # draw ticks on the right side
ytick.direction      : in    # direction: in, out, or inout
figure.figsize       : 8.0, 6.0   # figure size in inches
markers.fillstyle    : none  # full|left|right|bottom|top|none
というファイルを作り、
true-classic.mplstyle として上記のディレクトリに置き、
Jupyter Norebook で scripting を継続する……
mpl.rcdefaults()
mpl.style.use('true-classic')
plt.figure(1, figsize=(4, 3))
plt.plot(x, y, x1, y1, 'o', mfc='white')
plt.savefig('true-classic.png')
plt.show()
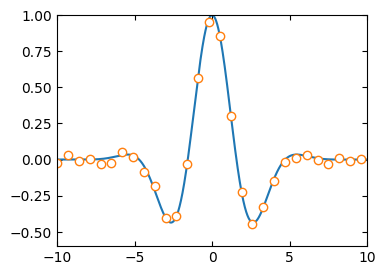
Fig.3, Matplotlib3 "real classic" style
見ての通り、
-
mpl.rcdefaults()を override できていて - 他の「問題」も解決できている
が、一方で、Y 軸の下端に tick が来ていないという問題が現れた。 これは、style にしたからではなくて、データの値によって、 このようになってしまう事があり、 これまではたまたま見逃していた、という事らしい。
気持ち悪いので、いろいろと試してみたが、どうやら、
figsize = (width, height) の height = 3
の付近でだけ起きる問題のようで、
このデータセットでは height > 3.2 もしくは height < 2.9 なら大丈夫。
実際、
mpl.rcdefaults()
mpl.style.use('true-classic')
plt.figure(1, figsize=(4, 3.3))
plt.plot(x, y, x1, y1, 'o', mfc='white')
plt.savefig('true-classic.png')
plt.show()
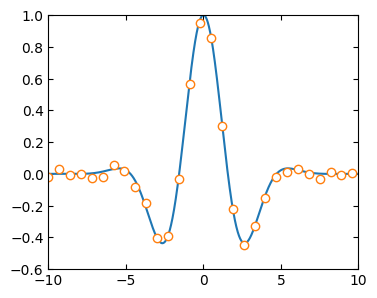
Fig.4, Matplotlib3 'real classic' style (height=3.3)
新しい mpl.ticker のバグだろうし、致命的な問題でもないので、
修正されるのを待つ事にする。
まとめ
最終的に、私的にあるべきグラフの形式 (以下 'true-classic') は:
- 上記のファイルを、
matplotlibrcという名前で~/.matplotlib/に置いて、初期化ファイルとし、 - さらに、
true-classic.mplstyleという名前で、${PVEHOME}/lib/python3.6/site-packages/matplotlib/mpl-data/stylelibの下に置いて、「スタイルシート」とする。 - これらによって、matplotlib を (最初に) 起動する毎に、true-classic 環境とし、
- 他の style もしくは、rcParams を設定した後で、完全に初期状態とするには、
mpl.rcdefaults()
mpl.style.use('true-classic')
とすれば良い。 - scatter plot で、marker を中空ではなく、白で埋めるには、
plt.plot(x, y, 'o', mfc='white')
(結局、これを default にできなかったが、 今となっては固執する程の事でもないかな、と思えてきた。) - プロットのサイズは、(100 dpi で) 8 x 6 インチを default としたが、
これも、
plt.figure(1, figsize=(width, height))
でこまめに設定しなおす事にする。(Jupyter notebook とそれぞれの "backend" で最適になる figsize を決めるのは難しいのと、 上記のバグを避けるため。)
2018-11-28 (Wed): Matplotlib-3.0
Matplotlib3 よ、お前もかっ
Matplotlib が、1.x から 2.0 になって、matplotlib によるプロットが 「プロらしくなくなった」だの、「Excel のグラフみたいで嫌だ」だの、 色々と文句を並べたのが二年前、 で、宣言どおりしばらくは「1.5.x で凌いでいた」が、やっぱり我慢できず、一年後に 2.0 のディフォルトをそれらしくする事に挑戦して使い始めた。 今日でまた略一年になる。
Matplotlib2 が、-2.2 までしか行ってないのに、いきなり 3.0 が出たのには、ちょっと驚いたが、それと同時に、 かつて私に「Matplotlib よ、お前もか」 と嘆かせた「ディフォルトのプロットパラメータ」が、元に戻ったのではないか、 とちょっと期待もした。
が、どうやら、その期待は空振りだったようだ。
PyVenv の % pip-commpile --upgrade; pip-sync
で、自動的に 3.0 に上った直後は期待通りの動きをしたので、一瞬喜んだが、
ローカルの設定 (~/pve36/matplotlibrc)
を一旦隠して、plot してみたら、やっぱり、-2.x
のディフォルトのままだった。(要するに pip-compile/pip-sync では
~/pve36/matplotlibrc は上書きされないなので、前の rc file
が残っていた、という事。)
(pve36) fukuda@falcon:~/JupNotes/PlotTest% grep matplotlib ~/pve36/requirements.txt
.....
matplotlib==3.0.2
.....
(pve36) fukuda@falcon:~/JupNotes/PlotTest% ipython
Python 3.6.7 (default, Oct 21 2018, 09:26:25)
Type 'copyright', 'credits' or 'license' for more information
IPython 7.1.1 -- An enhanced Interactive Python. ....
In [1]: import numpy as np
In [2]: import matplotlib.pyplot as plt
In [3]: import matplotlib as mpl
In [4]: mpl.matplotlib_fname()
Out[4]: '/Users/fukuda/JupNotes/PlotTest/matplotlibrc'
In [5]: plt.figure(1, figsize=(6, 4.5))
Out[5]: <Figure size 600x450 with 1 Axes>
In [6]: x = np.arange(-10, 10, 0.1)
In [7]: y = np.cos(x) * np.exp(-x * x / 5.0)
In [8]: x1 = np.arange(-10, 10, 0.7)
In [9]: y1 = np.random.normal(np.cos(x1) * np.exp(-x1 * x1 / 5.0), 0.02)
In [10]: plt.plot(x, y, x1, y1, 'o', mfc='white')
Out[10]:
[<matplotlib.lines.Line2D at 0x11aafafd0>,
 <matplotlib.lines.Line2D at 0x11ab03160>]
In [11]: plt.show()
In [12]: plt.rcdefaults()
In [13]: plt.plot(x, y, x1, y1, 'o')
Out[13]:
[<matplotlib.lines.Line2D at 0x11b846cf8>,
 <matplotlib.lines.Line2D at 0x11b846e48>]
In [14]: plt.show()
ここに、
- [4]: 実際に、どの rc file を読み込んでいるかを確認。 (確かに、working directory の matplotlibrc を読んでいる。)
- [10]: "mfc='white'" を省くようにはできない→後述
- [11]: MacOSX backend に出力される。それを png ファイルに落したものが、下の Fig.1.
- [12]: 最初に読み込んだ rc パラメータを破棄して、 ディフォルトの値に戻す。
- [14]: ディフォルト・パラメータでのグラフが出力される。 結果が下記の Fig. 2
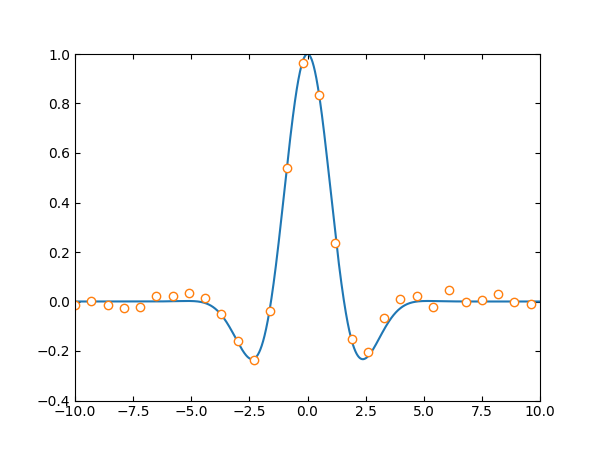
Fig-1, Matplotlib3 'my classic' style

Fig-2, Matplotlib3 'mpl default' style
パラメータ設定、rc ファイル……
上記の「ディフォルトの変更」は、要するに、
「Matplotlib, お前もかっ!(その 2)」
でやったように、
~/pve36/lib/python3.6/site-packages/matplotlib/mpl-data/matplotlibrc
を改変して、CWD (Current Working Directory) に置く事に尽きる。
しかし、作業領域 (directory) を沢山作って、そこから iPython や Jupyter
を立ち上げるようになると、それぞれに (変更した) matplotlibrc
を置くのは結構面倒だと思うようになった。
matplotlibrc
を捜す順序が明確に規定されている上に、どの directory
から読んだかを知る方法を見付けたので、
そこへ変更部分だけにした matplotlibrc_mystyle を置き、
matplotlibrc へ symbolic link を張ってみた。
結果は上々で、
(pve36) fukuda@falcon:~/.matplotlib% ln -s matplotlibrc_mystyle matplotlibrc
(pve36) fukuda@falcon:~/.matplotlib% cat matplotlibrc
axes.autolimit_mode : round_numbers
axes.xmargin        : 0  # x margin.  See `axes.Axes.margins`
axes.ymargin        : 0  # y margin See `axes.Axes.margins`
xtick.top            : True   # draw ticks on the top side
xtick.direction      : in    # direction: in, out, or inout
ytick.right          : True  # draw ticks on the right side
ytick.direction      : in    # direction: in, out, or inout
figure.figsize   : 8.0, 6.0   # figure size in inches
markers.fillstyle: none  # full|left|right|bottom|top|none
(pve36) fukuda@falcon:~/JupNotes/PlotTest% mv matplotlibrc hide.matplotlibrc
(pve36) fukuda@falcon:~/JupNotes/PlotTest% ipython
In [1]: import matplotlib.pyplot as plt

In [2]: import matplotlib as mpl

In [3]: mpl.get_configdir()
Out[3]: '/Users/fukuda/.matplotlib'

In [4]: mpl.matplotlib_fname()
Out[4]: '/Users/fukuda/.matplotlib/matplotlibrc'

In [5]: mpl.rcParams['xtick.direction']
Out[5]: 'in'
ここに、
- [3]: Linux/Unix によって異なり、BSD 系では、
~/.conf/matplotlibその他では、~/.matplotlib となると規定されているが、 macOS では後者となるらしい。 - [4]: 所期のファイルから、
- [5]: パラメータが正しく読めている。
実際、この後サンプルデータでプロットしてみたところ、上記の Fig-1 と同じプロットが得られた。めでたしめでたし!
が、残った課題もやはりあって、
matplotlibrcのなかの、figure.figsizeはIn [2]: mpl.rcParams['figure.figsize'] Out[2]: [8.0, 6.0]
という具合に但しく読み込まれて設定されているのに、 実際のプロットのサイズに反映されない。何故かIn [3]: plt.figure(1, figsize=(8, 6))
とやれば OK.- 依然として
plt.plot(..., 'o', mfc='white')の最後の引数を省略できるように、パラメータを設定する事はできていない。
2018-11-14 (Wed): 宅外サーバ (その 3)—Apache + SSL/TLS
やっぱりドキュメントがよく分からない
Let's Encrypt の「SSL/TLS サーバ証明書」を発行してもらって、HTTPS で我サイトにアクセスできるようにする、 というのは、もう二年以上前にやっている。 が、結構大変だったという記憶がある。ただ、実際の操作や設定が難しいというより、 tool が開発途上で急速に変化しており、そのせいもあってドキュメントがワケワカ…… という事が大きかったと思う。
なので、今回の「移行」にあたっても、まずは、 最新でかつ分かり易いドキュメントを捜すところから始めた。 が、しかし、なかなかそのような美味い話は転がっていない。期待の Let's Encrypt 総合ポータルさんからして、2016-10-19 で改訂が止まっている……。 Qiita 他でもっと新しいのも見付かったが、いずれもそのものズバリではなく、 Ubuntu-18.04 で具体的に適用するには、かなり Cut & Try が必要やろなぁ、と思わせるものばかり。
仕方ないので、二年前のやり方を踏襲して、一部は現在の環境に合わせて読み替えて、 設定を開始。 半日くらい右往左往した結果、www.waremo.com の方は HTTPS アクセスできるようになった。が、 dms.waremo.com (Apache + WSGI + Django) は、どうしてよいものやらさっぱり、 という状態になって行き詰まってしまった。
DigitalOcean のドキュメントに沿って
そんなところに
DigitalOcean さんの community page に行き当った……
実は「右往左往」の前に見付けていたのだけど、「certbot をインストールするのに、
ppa:certbot/certbotを加える」という下りを見て
「あ、これは古い」と早とちりをして捨ててしまったのだった。
ともあれ、実際にやってみると、このサイトのおかげで見通しよく、 しかも簡単に登録設定ができた。 (「わけわかの説明をもう一つ付け加える」のを避けるために「右往左往」は措いといて) そのうまく行ったプロセスだけを纏めると:
- http でアクセスできる環境を作る: 我々の例では www.waremo.com と dms.waremo.com だが、 既に動いているので問題無い。
- firewall で、443 port を開ける: 開いていなければ
- certbot をインストール:
ppa:certbot/certbotから最新版を - certbot を run: 自社 (自分) を登録し (最初だけ)、SSL/TLS key を生成し、xxxx.conf (<VirtualHost *:80>) から、 xxxx-le-ssl.conf (<VirtualHost *:443>) を作る
- アクセスしてみてテスト: apache を reload すれば即アクセス可
- 自動 renewal ために crontab 設定: 実は certbot が既にやってくれている
一見面倒そうだが、ユニークなのは 3. と 4. のみで、 他は当り前のステップと試験だけ。
具体的には、
1. 通常のサイトが動いている事を確認
fukuda@digoc03:~% ls /etc/apache2/sites-enabled/
waremo.conf@  wrm_dms2.conf@
fukuda@digoc03:~% sudo apache2ctl configtest
[sudo] password for fukuda:
Syntax OK
fukuda@digoc03:~% sudo systemctl reload apache2
2. Firewall を設定
fukuda@digoc03:~% sudo ufw allow "Apache Full"  #1)
fukuda@digoc03:~% sudo ufw status
Status: active

To                         Action      From
--                         ------      ----
OpenSSH                    LIMIT       Anywhere
Apache Full                ALLOW       Anywhere
OpenSSH (v6)               LIMIT       Anywhere (v6)
Apache Full (v6)           ALLOW       Anywhere (v6)
- #1) Apache Full は '80,443/TCP' のこと。
3. certbot をインストール
fukuda@digoc03:~% sudo add-apt-repository ppa:certbot/certbot  #2)
fukuda@digoc03:~% sudo apt install python3-certbot-apache      #3)
fukuda@digoc03:~% which certbot                                #4)
/usr/bin/certbot
fukuda@digoc03:~% certbot --version
certbot 0.26.1
- #2) 標準の ppa にも cerbot モジュールは有るが、これを加えておくと、 certbot は最新版になる。
- #3) 単に certbot ではなく、こう指定しておくと、python2.7 関連のパッケージがインストールされない。(ppa:certbot/certbot からのパッケージの場合に限る。)
- #4) certbot コマンドがインストールされている
4. certbot を起動して、key 作製から、conf ファイル作製まで
fukuda@digoc03:~% sudo certbot --apache -d waremo.com \      #5)
                   -d www.waremo.com -d dms.waremo.com
....
Enter email address (used for urgent renewal and security notices) (Enter 'c' to
cancel): fukuda@waremo.com                                   #6)
.....
fukuda@digoc03:~% sudo certbot --apache -d waremo.com \      #7)
                   -d www.waremo.com -d dms.waremo.com
....

What would you like to do?                                   #8)
- - - - - - - - - - - - - - - - - - - - - - - - - - - - - - - - - - - - - - - -
1: Attempt to reinstall this existing certificate
2: Renew & replace the cert (limit ~5 per 7 days)
- - - - - - - - - - - - - - - - - - - - - - - - - - - - - - - - - - - - - - - -
Select the appropriate number [1-2] then [enter] (press 'c' to cancel): 1
Keeping the existing certificate
Deploying Certificate to VirtualHost /etc/apache2/sites-enabled/waremo-le-ssl.conf
Deploying Certificate to VirtualHost /etc/apache2/sites-enabled/waremo-le-ssl.conf
Deploying Certificate to VirtualHost /etc/apache2/sites-enabled/wrm_dms2-le-ssl.conf

#9)
Please choose whether or not to redirect HTTP traffic to HTTPS, removing HTTP access.
- - - - - - - - - - - - - - - - - - - - - - - - - - - - - - - - - - - - - - - -
1: No redirect - Make no further changes to the webserver configuration.
2: Redirect - Make all requests redirect to secure HTTPS access. Choose this for
new sites, or if you're confident your site works on HTTPS. You can undo this
change by editing your web server's configuration.
- - - - - - - - - - - - - - - - - - - - - - - - - - - - - - - - - - - - - - - -
Select the appropriate number [1-2] then [enter] (press 'c' to cancel): 1

- - - - - - - - - - - - - - - - - - - - - - - - - - - - - - - - - - - - - - - -
Congratulations! You have successfully enabled https://waremo.com,
https://www.waremo.com, and https://dms.waremo.com

#10)
You should test your configuration at:
https://www.ssllabs.com/ssltest/analyze.html?d=waremo.com
https://www.ssllabs.com/ssltest/analyze.html?d=www.waremo.com
https://www.ssllabs.com/ssltest/analyze.html?d=dms.waremo.com
.....
- #5) '--apache' option を付け加える事で、apache のそれぞれの conf file に対応する HTTPS アクセスのための conf file を作製する。
- #6) 最初の certbot の起動に際してのみ email address を聞いてくる。 (以前と違って、他に聞かれる項目はない。)
- #7) 二度目以降のアクセスの場合を例示 (一度でうまくできれば必要ない。)
- #8) 既に certificate があるので、それをそのまままたインストールする (1) か、更新したものと置き換える (2) かを選ぶ。 (後者は、「アクセス頻度制限」の対象となる事に注意。)
- #9) HTTP でのアクセスを HTTPS に redirect するかどうかを決める。Redirect する場合は、xxxx.conf に、redirect に関するディレクティブを書き込む。 (一旦 redict とした後、ここで 1 を選んでもキャンセルできない——上記の xxxxx.conf から、 redirect 関連の directive を消去する必要がある。)
- #10) できたサイトの安全性を試験するための URL
5. テスト
fukuda@digoc03:~% sudo systemctl reload apache2
として、xxxx.conf, xxxx-le-ssl.conf への変更を反映させた後、 上記のl #6) のうちの例えば、 https://www.ssllabs.com/ssltest/analyze.html?d=dms.waremo.com にアクセスすると、それについての評価が得られる……
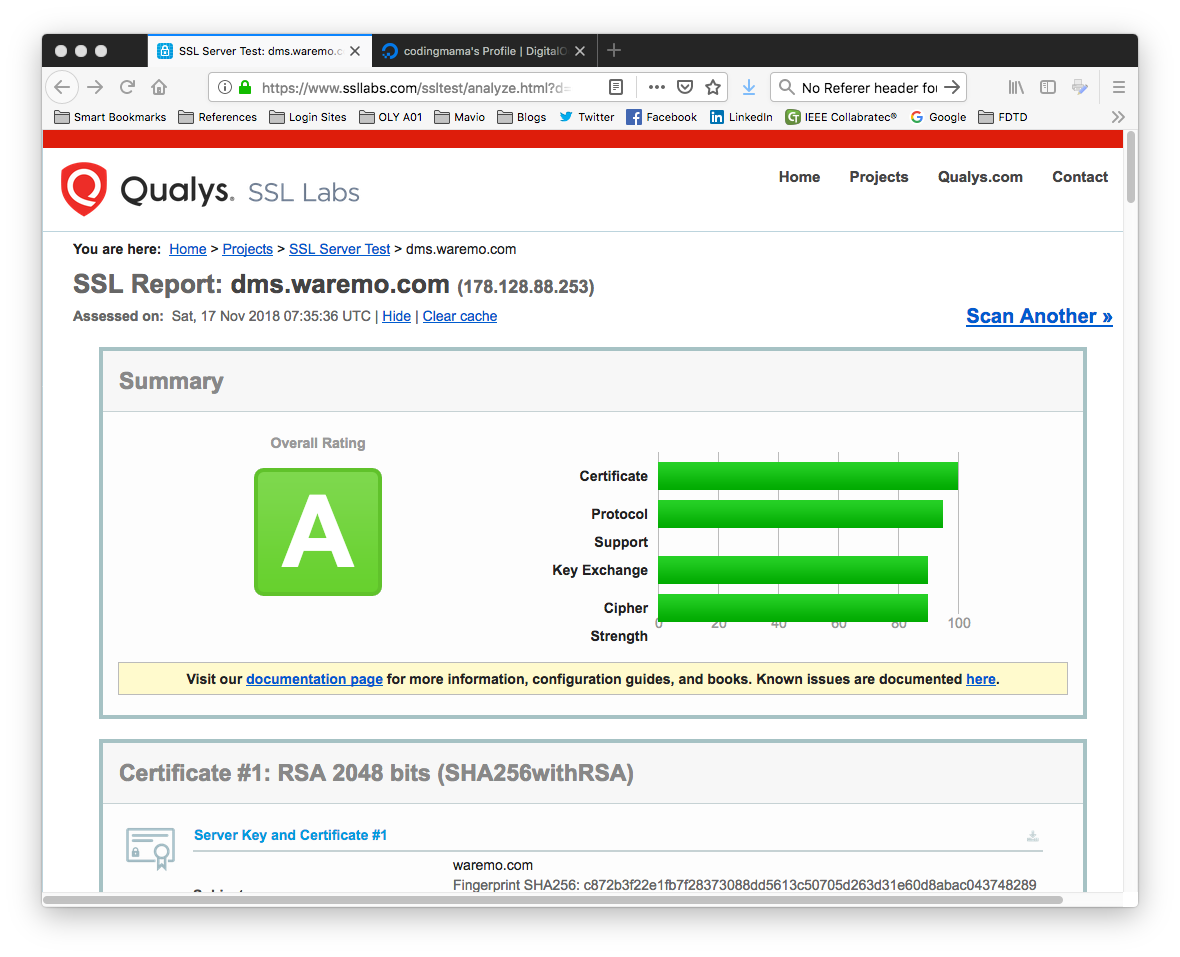
SSL Labs による dms.waremo.com の評価
「A 評価」がどれ程のものか実はよくわからないが、とりあえず secure として良いのでは、と思う事にする。
Firefox, Chrome, Safari のそれぞれでアクセスしてみた。 どれも、うまく行っているようだ。特に Chrome では、http でのアクセスでは "Not Secure" とやられていたので、それが無くなってちょっと気分がよい。
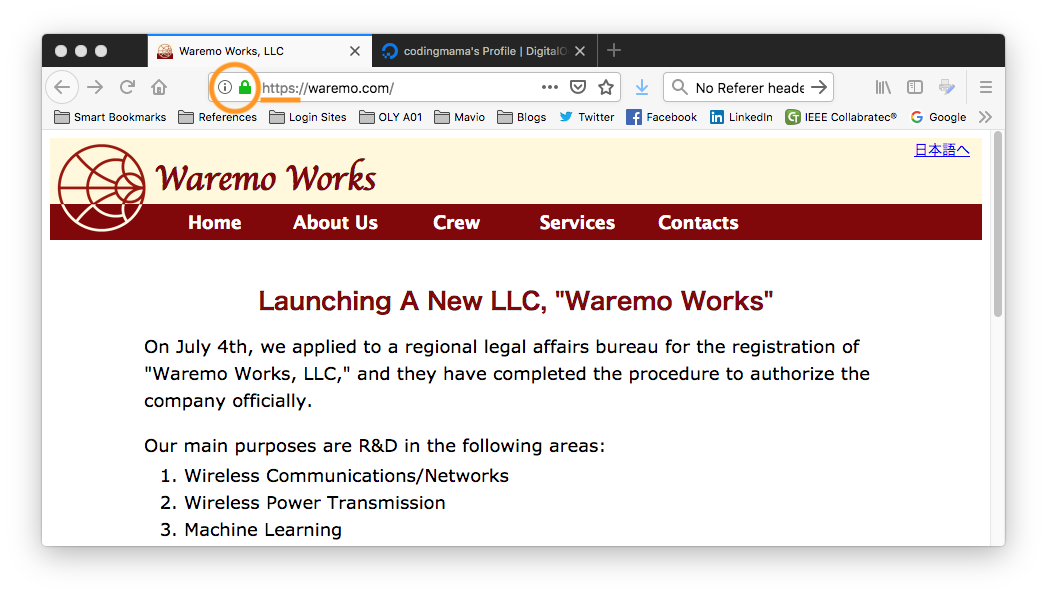
www.waremo.com へ、TLS でアクセス
6. 自動更新
自動更新の crontab entry は既に /etc/cron.d/certbot
に作られているので、
ここでは、それをチェックするだけ。
fukuda@digoc03:~% sudo certbot renew --dry-run
Saving debug log to /var/log/letsencrypt/letsencrypt.log

- - - - - - - - - - - - - - - - - - - - - - - - - - - - - - - - - - - - - - - -
Processing /etc/letsencrypt/renewal/www.waremo.com.conf
- - - - - - - - - - - - - - - - - - - - - - - - - - - - - - - - - - - - - - - -
Cert not due for renewal, but simulating renewal for dry run
Plugins selected: Authenticator apache, Installer apache
Renewing an existing certificate
Performing the following challenges:
http-01 challenge for dms.waremo.com
http-01 challenge for waremo.com
http-01 challenge for www.waremo.com
Waiting for verification...
Cleaning up challenges
.....
fukuda@digoc03:~% cat /etc/cron.d/certbot
# /etc/cron.d/certbot: crontab entries for the certbot package
SHELL=/bin/sh
PATH=/usr/local/sbin:/usr/local/bin:/sbin:/bin:/usr/sbin:/usr/bin

0 */12 * * * root test -x /usr/bin/certbot -a \! -d /run/systemd/system && \
   perl -e 'sleep int(rand(43200))' && certbot -q renew
まとめ
コアの部分は
なんとかスッキリさせたいと頑張ってみたものの、 結局かなりゴチャゴチャした記述になってしまったが……。敢えてまとめると
- Ubuntu-18.04 + apache2 (> 2.4.8) の上で、VirtualHost
http://www.xxxx.comとhttp://www.yyyy.comが公開されており、 それぞれxxxx.confとyyyy.confの中で、ServerName: {www.xxxx.com, www.yyyy.com}と定義されていれば - (apache が動いており、443 ポートが開いた状態で)
% sudo certbot --apache -d www.xxxx.com -d www.yyy.com
とやるだけで、- certificate が作製、登録、保存され
- 対応した VirtualHost の conf
(
xxxx-le-ssl.conf, yyyy-le-ssl.con) が作られて、enable され - 自動更新のための crontab entry が
/etc/crond.d/certbotに作られる
- あとは、新たに作られた VH conf を
% sudo systemctl reload apache2
で読み込ませれば Secure Connection が張れる。
若干の保留と留意点
ppa:certbot/certbotを付け加えるのは「凝り過ぎ」かも。 純正の dpkg でも、十分用は足せる (検証済み)。 但し、python2.7 と関連のモジュールがインストールされるのは避けられない。- Redirect とは、http でアクセスした場合でも、強制的に https
と書換える事。そうしないと
SSL/TLS 化する事自体にあまり意味が無いように思えるので、現状そうやっているが、
実はこの場合、validater.w3.com の 「HTML5 検証バッジ」
 がうまく働かない。
2018-11-07 (Wed): 宅外サーバ (その 2)—Apache+mod_wsgi
さて、サーバ機能を digoc02 から、digoc03 に移すのであるが、 そのうちウェブサイト (httpd = Apache) を移すのは簡単だろう、と思っていた。 が、Django + mod_wsgi がからむと、そうは問屋が……
とは言え、18.04 は Python-3.6 がディフォルトであるので、大分楽になっている。
PyVenv で Djnago + mod_wsgi
なにはともあれ、venv を整えなければいけない。既にやっている (ssh の設定を アプリ名でやるために) が、ここで
fukuda@digoc03:~% sudo apt install python3-venv, python3-dev, apache2, apache2-dev
fukuda@digoc03:~% sudo apt install libapache2-mod-wsgi-py3
が済んでいる事が大前提。(libapache2-.... は先週の記事から漏れていた。) これから
fukuda@digoc03:~% python3 -m venv pve36
fukuda@digoc03:~% cd pve36
fukuda@digoc03:~/pve36% . bin/activate
(pve36) fukuda@digoc03:~/pve36% cat requirements.in
django
mod-wsgi
ipython
numpy
matplotlib
simplejson
(pve36) fukuda@digoc03:~/pve36% pip-compile
.....
django==2.1.3
ipython-genutils==0.2.0   # via traitlets
ipython==7.1.1
.....
matplotlib==3.0.1
mod-wsgi==4.6.5
numpy==1.15.4
.....
(pve36) fukuda@digoc03:~/pve36% pip-sync
.....
Successfully installed django-2.1.3 numpy-1.15.4 prompt-toolkit-2.0.7 pyparsing-2.3.0
無事、iPython も django, mod-wsgi もインストールできているようだ。 (先の libapache2-mod-wsgi-py3 が欠けていると、pip-compile でエラーとなるが、その error message からは、このモジュールが欠けている事は想像がつかない……)
さらにここで、mod_wsgi の言わば dev server である mod_wsgi-express を使って動作確認をしておく。
(pve36) fukuda@digoc03:~/pve36% mod_wsgi-express start-server
Server URL         : http://localhost:8000/
Server Root        : /tmp/mod_wsgi-localhost:8000:1000
Server Conf        : /tmp/mod_wsgi-localhost:8000:1000/httpd.conf
Error Log File     : /tmp/mod_wsgi-localhost:8000:1000/error_log (warn)
Request Capacity   : 5 (1 process * 5 threads)
Request Timeout    : 60 (seconds)
Startup Timeout    : 15 (seconds)
Queue Backlog      : 100 (connections)
Queue Timeout      : 45 (seconds)
Server Capacity    : 20 (event/worker), 20 (prefork)
Server Backlog     : 500 (connections)
Locale Setting     : en_US.UTF-8
ここで、waremo.mine.nu:8000 にアクセスすると、 下のような表示が得られて mod_wsgi のインストール・設定を確認できる:
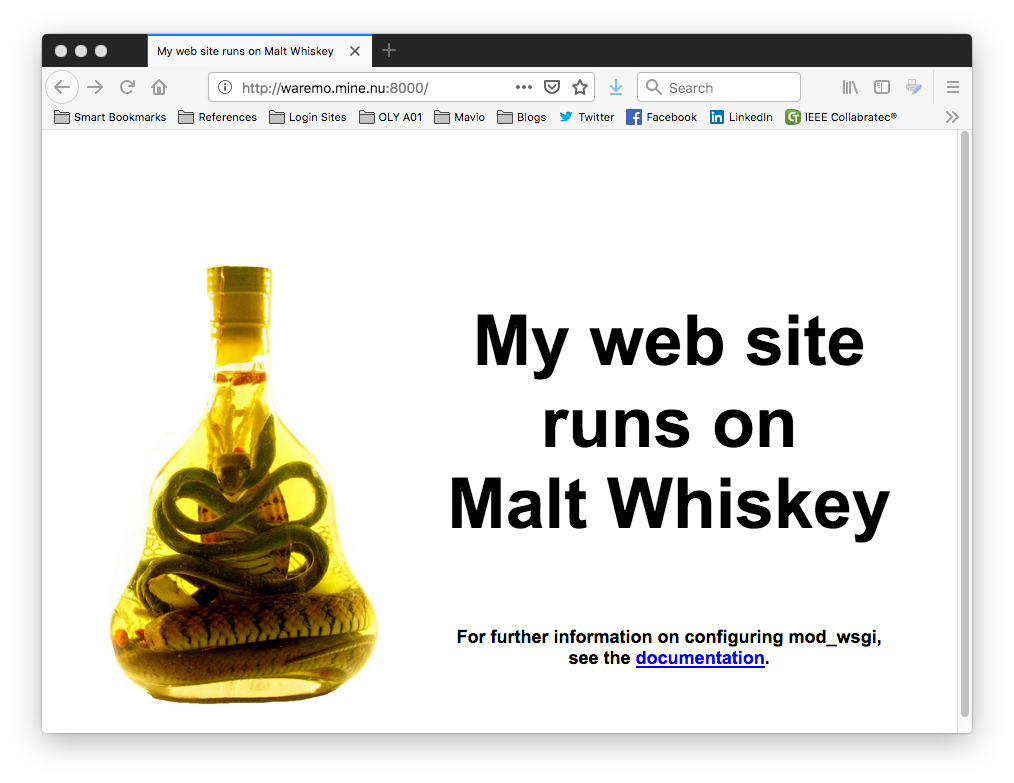
mod_wsgi-express を使って、mod_wsgi をテスト
CPU, Network 性能
ここで、iPython も入った事だし、ちょっとパフォーマンスを確かめておく。
(pve36) fukuda@digoc03:~% wget http://www.python.org/ftp/python/3.6.2/Python-3.6.2.tar.xz
URL transformed to HTTPS due to an HSTS policy
.....
Python-3.6.2.tar.xz.6     100%[===================================>]  16.12M  --.-KB/s    in 0.1s
.....
2018-11-01 10:57:09 (146 MB/s) - ‘Python-3.6.2.tar.xz.6’ saved [16907204/16907204]
(pve36) fukuda@digoc03:~/pve36% ipython
Python 3.6.6 (default, Sep 12 2018, 18:26:19)
Type 'copyright', 'credits' or 'license' for more information
IPython 7.1.1 -- An enhanced Interactive Python. Type '?' for help.

In [1]: import numpy as np

In [2]: A = np.random.rand(1024, 1024)

In [3]: %timeit B = np.linalg.inv(A)
92.7 ms ± 4.41 ms per loop (mean ± std. dev. of 7 runs, 10 loops each)

In [4]: %timeit C = np.fft.fft2(A)
60.3 ms ± 1.55 ms per loop (mean ± std. dev. of 7 runs, 10 loops each)
(pve36) fukuda@falcon:~% ping waremo.mine.nu
PING waremo.mine.nu (178.128.88.253): 56 data bytes
64 bytes from 178.128.88.253: icmp_seq=0 ttl=50 time=80.492 ms
64 bytes from 178.128.88.253: icmp_seq=1 ttl=50 time=79.828 ms
64 bytes from 178.128.88.253: icmp_seq=2 ttl=50 time=79.728 ms
64 bytes from 178.128.88.253: icmp_seq=3 ttl=50 time=85.569 ms
64 bytes from 178.128.88.253: icmp_seq=4 ttl=50 time=80.900 ms
64 bytes from 178.128.88.253: icmp_seq=5 ttl=50 time=79.828 ms
64 bytes from 178.128.88.253: icmp_seq=6 ttl=50 time=79.489 ms
^C
--- waremo.com ping statistics ---
7 packets transmitted, 7 packets received, 0.0% packet loss
round-trip min/avg/max/stddev = 79.489/80.833/85.569/1.986 ms
これらを digioc02 と比較しておく。
| Droplet | linalg.inv() (ms) |
fft.fft2() (ms) | Transfer Rate (Mbps) |
Turnaround Time (ms) |
|---|---|---|---|---|
| digoc02 | 145 | 82 | 311 | 79.6 ± 1.5 |
| digoc03 | 92.7 | 60.3 | 1139 | 79.5 ± 2.0 |
| digoc04 | 146 | 61.3 | 1152 | 79.7 ± 2.4 |
ちなみに、digoc04 は、当初採用しようとしていた "2 GB / 50 GB Disk /SGP1" で、$10/Mo. これだけ見ていると waremo.com なんかには、これで十分だったかな、と。
wrm_dms2
Django-2.x 用の Waremo DMS (wrm_dms2) は、github から取って来る。
一方、db.sqlite3 と files/(upload したファイル)
は、現行のサーバ(waremo.com)から rsync で取ってくる。
fukuda@digoc03:~% git clone https://github.com/waremo/wrm_dms2.git
fukuda@digoc03:~% sudo rsync -Cuav \
     fukuda@waremo.com:wrm_dms2/db.sqlite3 wrm_dms2/    #1)
fukuda@digoc03:~% ls -l wrm_dms2/db.sqlite3
-rw-rw-r-- 1 fukuda www-data 12561408 Nov  6 00:07 wrm_dms2/db.sqlite3
fukuda@digoc03:~% sudo rsync -Cuav \
     fukuda@waremo.com:wrm_dms2/index/files/ wrm_dms2/index/files
fukuda@digoc03:~% recent wrm_dms2/index/files          #2)
total 1198432
-rw-r--r-- 1 www-data www-data   193341 Nov  4 03:31 WAD-ART18-0023_A.pdf
-rw-r--r-- 1 www-data www-data 37814372 Nov  2 08:48 WAD-TEM18-0004_A.pdf
-rw-r--r-- 1 www-data www-data 15749940 Nov  2 08:47 WAD-TEM18-0004_A.tar.xz
-rw-r--r-- 1 www-data www-data  1008891 Oct 31 08:01 WAD-ART18-0022_A.tar.gz
-rw-rw-r-- 1 fukuda   fukuda    2024709 Oct 31 02:00 WAD-ART18-0005_A.pdf
- #1) sudo で super-user permission を与え、waremo.com には fukuda でログインする……waremo.com が root の login を許さない条件の下で、owner:group を保存するためにこうした。
- #2)
files/下に、これらのファイルを持ってくる方法によって、 permission と owner:group が区々になっている。
ここまでで、「ポーティング」は完了、data base (db.sqlite3) を
fukuda@digoc03:~/wrm_dms2% . ../pve36/bin/activate
(pve36) fukuda@digoc03:~/wrm_dms2% python manage.py makemigrations
Migrations for 'index':
  index/migrations/0002_auto_20181106_1828.py
    - Alter field cannot_delete on document
    - Alter field current on document
    - Alter field date_issued_temp on document
    - Alter field is_public on document
(pve36) fukuda@digoc03:~/wrm_dms2% python manage.py migrate
Operations to perform:
  Apply all migrations: admin, auth, contenttypes, index, sessions, users
Running migrations:
  Applying index.0002_auto_20181106_1828... OK
(pve36) fukuda@digoc03:~/wrm_dms2% python manage.py runserver 0:8000
Performing system checks...

System check identified no issues (0 silenced).
November 06, 2018 - 18:30:46
Django version 2.1.3, using settings 'mysite.settings'
Starting development server at http://0:8000/
Quit the server with CONTROL-C.
[06/Nov/2018 18:36:03] "GET / HTTP/1.1" 200 12135
[06/Nov/2018 18:36:03] "GET /static/default.css HTTP/1.1" 200 4284
[06/Nov/2018 18:36:03] "GET /static/favicon.ico HTTP/1.1" 200 1150
この時、http://dms.waremo.mine.nu:8000
にアクセスすると、下のようなレスポンスが得られる。
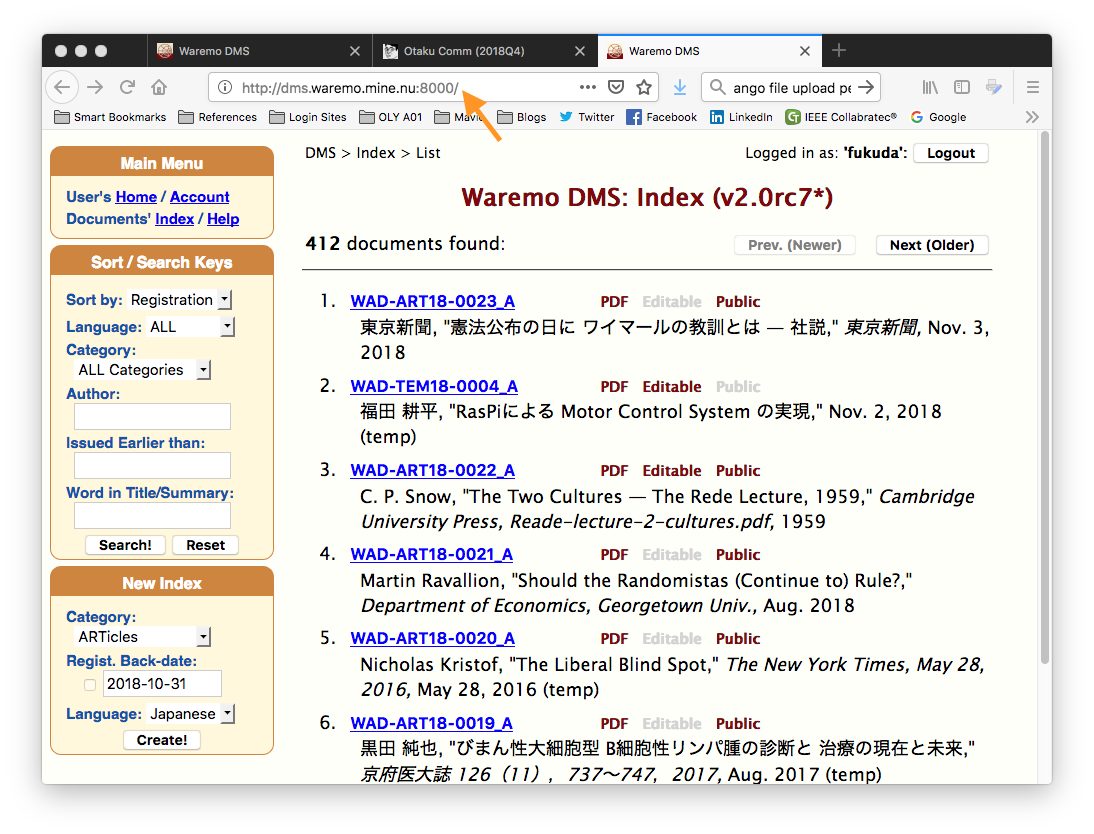
digoc03 上の Django dev-server による wrm_dns2
Apache2
上記までで、Django App の wrm_dms2 と、mod_wsgi がどちらもちゃんと動いている事が確認できたので、wrm_dms2 を mod_wsgi と apache2 を使って公開する設定にかかる。
あらましは:
- wsgi.load (mod.conf): wsgi.load の "LoadModule"
が、
~/pve36の下の wsgi を指すように編集する。 - wrm_dms.conf (site.conf): で、Virtual Host を定義、その中で、HostName, WSGIPythonHome 等を定義する
これらをより確実に指定できるように、pip install した mod_wsgi モジュールは、そのためのコマンド mod_wsgi-express を持っていて、 それによって
(pve36) fukuda@digoc03:~/pve36% mod_wsgi-express module-config
LoadModule wsgi_module \
    "/home/fukuda/pve36/lib/python3.6/site-packages/mod_wsgi/server/mod_wsgi-py36.cpython-36m-x86_64-linux-gnu.so"
WSGIPythonHome "/home/fukuda/pve36"
この結果を用いて、mod_wsgi.load を変更し、また
wrm_dms2.conf を作製する。
(pve36) fukuda@digoc03:/etc/apache2% cat mods-available/wsgi.load
#LoadModule wsgi_module /usr/lib/apache2/modules/mod_wsgi.so
LoadModule wsgi_module /home/fukuda/pve36/lib/python3.6/site-packages/mod_wsgi/server/mod_wsgi-py36.cpython-36m-x86_64-linux-gnu.so
(pve36) fukuda@digoc03:/etc/apache2% cat sites-available/wrm_dms2.conf
<VirtualHost *:80>
  ServerName dms.waremo.com
  ServerAlias dms.waremo.mine.nu               #1)
  WSGIScriptAlias / /home/fukuda/wrm_dms2/mysite/wsgi.py
#  WSGIApplicationGroup %{GLOBAL}
  WSGIDaemonProcess dms.waremo.com\            #2)
     python-path=/home/fukuda/wrm_dms2:/home/fukuda/pve36/lib/python3.6/site-packages
  WSGIProcessGroup dms.waremo.com
  Alias /static/ /home/fukuda/wrm_dms2/htdocs/
  Alias /favicon.ico /home/fukuda/wrm_dms2/htdocs/img/favicon.ico
  <Directory /home/fukuda/wrm_dms2/htdocs>
   	 Require all granted
  </Directory>
  <Directory /home/fukuda/wrm_dms2/mysite >
    <Files wsgi.py>
      Require all granted
    </Files>
  </Directory>
	ErrorLog ${APACHE_LOG_DIR}/error.log
	CustomLog ${APACHE_LOG_DIR}/access.log combined

</VirtualHost>
(pve36) fukuda@digoc03:/etc/apache2% sudo a2enmod wsgi
(pve36) fukuda@digoc03:/etc/apache2% sudo a2ensite wrm_dms2
(pve36) fukuda@digoc03:/etc/apache2% sudo systemctl reload apache2
- #1) テスト用の server name はここに書いておくと、 他を一切触らなくても、dms.waremo.com からもアクセスが可能に
- #2) 一応、wsgi を daemon-mode で働かせているつもり……未確認
こうしておいて、http://dms.waremo.mine.nu:80 にアクセスすると、 上の図のような表示が得られる筈。 さらに、DynDNS で、waremo.com を digoc03 の IP address に向けると、http://dms.waremo.com で wrm_dns2 にアクセスできるようになる。
この間、10 日程実稼働させているが、特に問題は見付かっていない。
2018-10-31 (Wed): 宅外サーバ (その 1)—Ubuntu-18.04
かつては、自宅サーバを立ち上げ、それをメンテナンスする事に血道を上げていた…… 最初は自作の PC Linux と Red Hat だったが、後には何代かの ThinkPad に Ubuntu に移行した。 それはそれで面白かったし勉強にもなったが、 いかんせん時間を食い過ぎ——主に H/W の問題に悩まされた。
DigitalOcean VPS 讃
なんとかせねば、という事で、思い立ったのが、自宅サーバを、宅外サーバ (VPS) に移す事。これで、少くとも H/W にかける手間暇はかなり省けるだろうと目論んだのだった。
大まかには
- VPS は DigitalOcean: 2GB/40GB の "droplet" で $20/Mo. 月間の最大データ転送量は、2TB で、それを超えると、 追加料金となるが、残念ながらそれを請求される事は終ぞなかった。
- OS は Ubuntu の LTS: Ubuntu 14.04/16.04 LTS. 2 年間はその版を使い続ける。
という方針。やってみたら、誠に具合が良い。
- DgitialOcean VPS はすこぶる安定していて、ダウンタイムは、 ネットワークも含めて一度も無かった (気がつかなかっただけ?) 一度「Network H/W を更新するから、 数分間転送速度が低下するかも」という警告を受けたが、 それも実際には検知できなかった。
- それに載った Ubuntu 14.04 LTS, 16.04 LTS もとても安定していて、 package 管理の apt で、ほぼ完全自動 (いいなり、という意味) でアップグレードしても、殆んどの場合問題無かった。
- ブートやリブートがとても早い。 こちらからリブートさせても、瞬く間に立ち上がり、ダウンタイムは 10-15 秒くらい。 なので、カーネルアップデートの度のリブートも、ユーザからは見えてない筈。
- CPU 性能もメモリ容量も十分。固より、 Apache2, Postfix, Mailman 等が主な負荷なので、 然程の要求が厳しくない、という事もあるが
- Network も頗る速い。手許のローカルホストとの転送では、NTT の Flet's がボトルネックになって 4 Mbps なんて事もあるが、 例えば、python.org からだと、コンスタントに 500 Mbps 以上出ている。 但し、kernel update の際の sgp1.mirrors.digitalocean.com との間では 20 Mbps くらい (それでも十分速いが)。
- ローカルホストからの turn-around time は、singapore のサイトという事もあり、ConoHa や 「さくら」の VPS と比較して唯一不安が残る性能項目であったが、75 ms くらいを維持している。これは、ssh login した時のレスポンスに「もろ」 に響くが、キー操作に付いて来れてない、と感じる事は殆んど皆無であった。 (上記の要に、手許の光回線の転送速度が 4 Mbps というように混んでいる場合でも。)
とまあ、殆んど「絶賛」…… :-) でも、それなら、そのまま使い続ければ良いようなものだが、 そうは行かないのがオタクの性で……で、無理に cons を挙げると
- 現行の droplet は、OS の install/upgrade が純正のものとは異なり、 control panel が介在する方式となっている。最初は、control panel からも kernel update はできなかった!後にその制限は緩和され、現状となっているが、 これを解消するには、droplet を一から作り直すしかない。
- とは言え、OS を是非とも上げたい理由というのも然程多くはない……。 敢えて挙げるなら、Python3 のパッケージを、3.6 にしたい、という事くらいか? 現行の 16.04 では、default (純正) が 3.5.2 で、PyVenv で mod-wsgi にコンパチビリティの問題が出る。勿論、jonathanf PPA で 3.6.x にする事も可能で実際試してみたが、この場合 mod-wsgi 以前に、 iPython とか Jupyter も、うまく pip-compile/pip-sync できなかった。
- DigitalOcean の droplet の賃貸料は下がり続けていて、 いまでは、かつての約半額となっている。(droplet を作り直さないと、 この料金が適用されない :-( )
という事で、どうしても droplet を作り直さねばならぬ。:-)
新 droplet で、Ubuntu-18.04 LTS を立ち上げる
という訣で、やっぱり DigitalOcean の VPS を使い続ける。 DigitalOcean の Droplet -> Create -> Create Cloud Server の画面に沿って、あらましを示すと
- Distribution: Ubuntu 18.04 x64
- Size: $20/Mo, 4GB/2CPU, 80GB, 4TB #1)
- Add backups: Yes
- Data center region: Singapore 1 ("sgp1") #2)
- Select additional options: None
- Add your SSH keys: None #3
- Finalize and Create - Choose a hostname: digoc03 #4)
ここに、
- #1) 半額の 2GB/1CPU, 50GB にする予定だったが、つい……
- #2) 従来通り、Singapore のサイトにした。
- #3) ここで SSH Key (local host の id_rsa.pub )
を書き込んでおけば、(仮パスワードのメールでのやりとり無しに)
droplet 立ち上げ後、いきなりログインできる筈であるが、
実際には
.  fukuda@falcon:~% ssh root@178.128.xxx.xxx
  root@178.128.xxx.xxx: Permission denied (publickey).
となり、何度やっても上手く行かない。 なので従来通りここを空欄にして、最初は password login で始める。 - #4) これが hostname となる。
このページで、[Create] ボタンを押すと、30 秒前後で droplet がインストールされて走り始める。
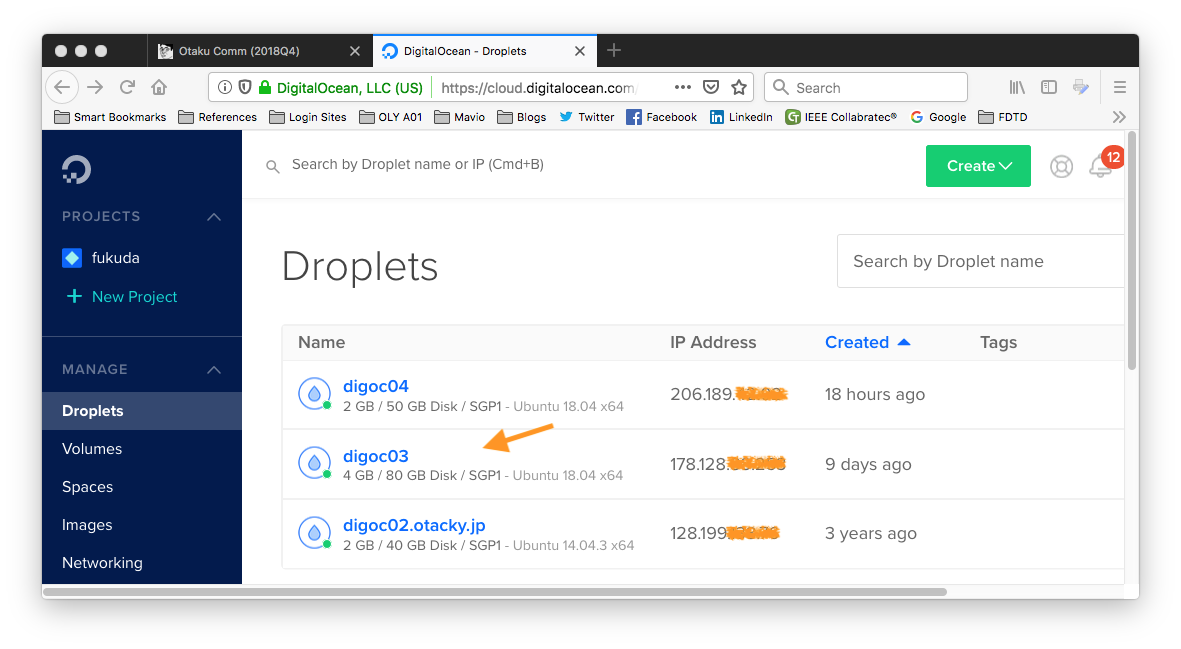
新 droplet, digoc03
最初のログインと初期設定
このサイトはいずれ waremo.com となるのであるが、暫定的に DynDNS にて、waremo.mine.nu を割り当てておく。
同時に、初期 password が登録メールアドレスへ送られてくるので、 次のようにして、root と user の password を設定する。
fukuda@falcon:~% ssh root@waremo.mine.nu
root@waremo.mine.nu's password:
You are required to change your password immediately (root enforced)
Welcome to Ubuntu 18.04.1 LTS (GNU/Linux 4.15.0-36-generic x86_64)
Changing password for root.
(current) UNIX password:
Enter new UNIX password:
Retype new UNIX password:
root@digoc03:~# apt update
root@digoc03:~# apt upgrade
root@digoc03:~# adduser fukuda
root@digoc03:~# adduser fukuda sudo
root@digoc03:~# exit
ここで、さらに user でログインして、環境設定:
fukuda@falcon:~% ssh fukuda@waremo.mine.nu
fukuda@digoc03:~$ sudo apt install zsh lv apache2 apache2-dev python3-dev python3-venv emacs-nox
fukuda@digoc03:~$ scp otacky.jp:.zshrc .
fukuda@digoc03:~$ rsync -Cuav otacky.jp:.emacs.d .
fukuda@digoc03:~$ chsh fukuda
Password:
Changing the login shell for fukuda
Enter the new value, or press ENTER for the default
	Login Shell [/bin/bash]: /bin/zsh
fukuda@digoc03:~$ zsh
fukuda@digoc03:~%
firewall と ssh 設定
fukuda@digoc03:~% sudo ufw limit OpenSSH
fukuda@digoc03:~% sudo ufw enable
fukuda@digoc03:~% sudo ufw allow "Apache Full"
fukuda@digoc03:~% sudo ufw status
Status: active

To                         Action      From
--                         ------      ----
OpenSSH                    LIMIT       Anywhere
Apache Full                ALLOW       Anywhere
OpenSSH (v6)               LIMIT       Anywhere (v6)
Apache Full (v6)           ALLOW       Anywhere (v6)

fukuda@digoc03:~% ssh-keygen
Generating public/private rsa key pair.
Enter file in which to save the key (/home/fukuda/.ssh/id_rsa):
Created directory '/home/fukuda/.ssh'.
Enter passphrase (empty for no passphrase):
Enter same passphrase again:
Your identification has been saved in /home/fukuda/.ssh/id_rsa.
Your public key has been saved in /home/fukuda/.ssh/id_rsa.pub.
The key fingerprint is:
SHA256:0oOT5a1p9bKFey0d5QClxG....xxxx.....ImuijPSaiOP9VTQ fukuda@digoc03
The key's randomart image is:
+---[RSA 2048]----+
|           ..o*o |
|        . ..+o.. |
|        .E ..+ . |
.....
|+ +   ..   =o o  |
|.o ...    o. .   |
+----[SHA256]-----+
fukuda@digoc03:~% cat falcon.id_rsa.pub >> .ssh/authorized_keys
fukuda@digoc03:/etc/ssh% sudo cp sshd_config sshd_config.orig
fukuda@digoc03:~% sudo cp /etc/ssh/sshd_config /etc/ssh/sshd_config.orig
fukuda@digoc03:~% sudo emacs /etc/ssh/sshd_config
fukuda@digoc03:~% diff /etc/ssh/sshd_config{,.orig}
33d32
< PermitRootLogin no
fukuda@digoc03:~% sudo systemctl restart ssh
以上までで、digoc03 の firewall は:
- ssh, http, https のみ inbound の接続を許す
- 但し、ssh については、
- limit (30 秒間に 5 回を超えるアクセスをすれば、その IP address は拒否する。)
- root への login を許さない
- (公開鍵が登録済みの) falcon からは、password 無しでログイン可
- それ以外の user からは password ログイン
345/1,945,360
